With that being said, that brings me to the first design I have to show you.
 Started off with pure white nails, China Glaze White on White style.
I like this white because it's not too chalky. Some whites do just look pure white-out on me.
Unfortunately I forgot to take a pic of the red-only, but essentially all I did was tape off all but the top angled half of the nail, and then painted it red with China Glaze's Red Pearl. I REALLY am not a fan of red ANYTHING, but it's not a bad polish. Has a bit of a shine to it.
After letting that and of course a coat of SV dry, I taped off all but the opposite corner, and then painted over with China Glaze(of course)'s Frostbite. Now Frostbite is a unique blue. Not TOO dark, and a very nice frosty shimmer.

I don't know why, but the blue was an absolute pain in the ass to do. The mani itself couldn't have taken me more than 2 minutes per nail, and that's including base, white, rip tape, place tape, paint, sv, repeat. But the blue just would not cooperate. Even at the end you could still see the red lines through, but as I was going to be in a dark hockey arena all night I called it good.
Here's a couple more shots of how it turned out.
I also thought I'd mention the routine products I use. I don't swear by it, but the base coat I've been using consistently is China Glaze's Strong Adhesion Base Coat. I don't get much staining, but occasionally there is a little. Sally Hansen makes a couple good base coats as well. I don't recommend Seche Vite's, though, unfortunately. As for top coat, I almos
 t always use SV, if I'm doing any top coat.
Moving on... the design I did to inspire the above one, I'm not particularly fond of, because I kind of grabbed the wrong color in the dark...oops. I used the identical method as listed above, but I only did one corner. It was meant to be black with blue glitter, and I didn't realize until taking photos that I grabbed a teal glitter.

Anywho. Black is CG Liquid Leather. Teal is Finger Paint's Art you Wondering. I took a closeup of the bottle to show how pretty the glitter is. The blue I was going to use is EVEN PRETTIER, but I'll save that for another day!
The last mani I have to show you today is another half moon one. I definitely did steal the color combo off of Pinterest, so here is the link to the original post. I wish I had used the OPI color :/.

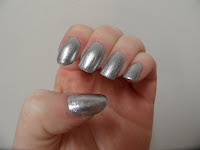
I started off with a base coat of LA Colors silver glitter...I know it HAD a name, but it's nowhere on the bottle. I've honestly bought about 5 more silver glitters/foils trying to find a PURE foil, but this is by far the best I can find, and it cost a whopping $1 at Dollar Tree. I did mess up one nail a bit :(.

I then used the same method mentioned a few blogs back, but took a pic this time! And did an overcoat of CG For Audrey.
I really wish I could say I like how the colors went together, but I'm not a huge fan. However, it is very spring appropriate, so it's stayed for now. Here's the final result, as well as a couple more pics of the silver to show how well it turned out on it's own. And a super cheap ring I got from Claires, which kind of tied it all together nicely, I think.


-T


No comments:
Post a Comment